Beading Basics – Beading Needles
Beading needles are something that everyone who does beadweaving uses with their projects. The humble beading needle has gone from just one more supply item to something more high-tech.
Let’s take a look at beading needles, and then also see a video on this supply item that beadweaving wouldn’t be the same without!
Beading Needle Basics
What is a beading needle, anyway, and why is it different from any other needle you may have on hand?
A beading needle is thin, and it has a larger eye in comparison to its thickness, than does a regular sewing needle. While you can use a sewing needle for some projects with larger seed beads, a beading needle is very much a necessity for smaller seed beads and many gemstone beads – especially cultured pearls.
What about lengths? They do come in several lengths, with the longer being designated as “longs” and the shorter as (you guessed it) “shorts”. Which should you use? It’s mostly a preference — whichever is most comfortable for you.
Beading Needle Sizes
The needles come in sizes 10, 11, 12, 13 and 15. (There may be a 14 out there somewhere, but I haven’t come across one.) Like wire, the bigger the number, the thinner the needle.
The most common two sizes are 10 and 12. If you can find an 11, though, snag it — it’s thin enough for most seed beads, but has a larger eye that is easier to thread.
I do have some 13s and even a 15, but I rarely use them. Actually, come to think of it, I have never used the size 15! I can’t see the eye, much less thread it, LOL. 😉
Basics of Beading Needles Video
If you want to learn a little more about the humble beading needle, and see why it’s gone more high-tech, click the video to watch and see the different kinds of needles that are out there.
Enjoy!!!
Odd Count Peyote Tutorial – The Odds are in Your Favor
Bracelet “Confetti Fun”
If you’ve been trying to find an odd count peyote tutorial with some cool projects, sit tight — I’ve got something for you! But before we talk about the projects, let’s talk about odd count peyote versus even count.
Even count peyote is a beadweaving stitch that is usually one of the very first that people learn, when getting into beading. It’s easy and there are no funky “extra steps” like you might see in square stitch or right angle weave. No doubt about it, even count is straightforward. But there’s a problem — you can’t make a project with a centered design.
Odd count peyote does allow a centered design, and gives you greater freedom of design. The problem? On odd-number rows, there is a funky turn that can be frustrating to learn (but easy once you’ve mastered it).
(Actually, there’s an easy way to do that turn — more about that in a minute.)
There be Dragons! Bracelet
The point is this – by learning odd count peyote, you expand your beading world. Not to mention, you can do some pretty cool projects!
About the Tutorial
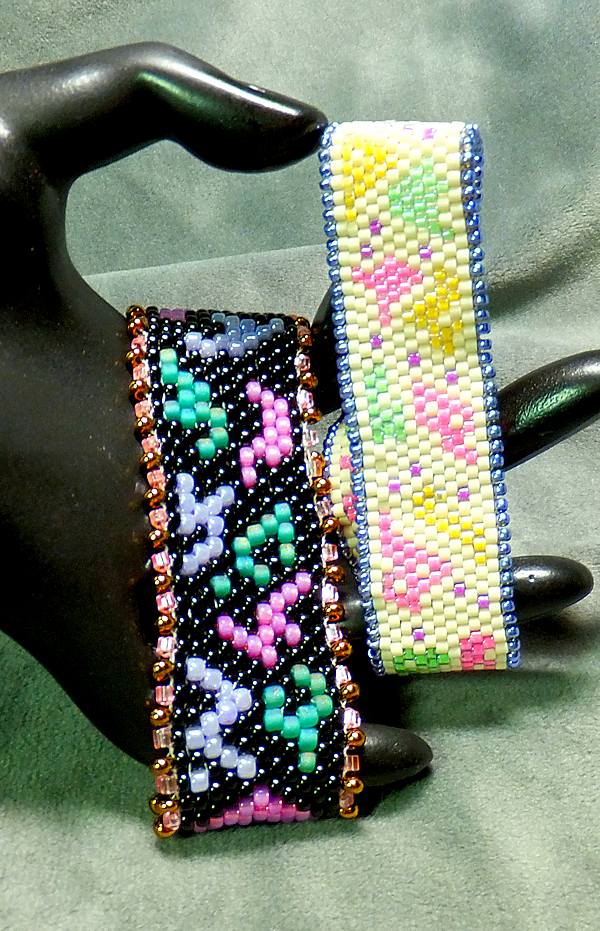
So, what about this tutorial? First, you get three main projects, with alternate ideas as well. The three bracelets you’ll learn to make are:
- Confetti Fun: This bracelet is a starting point to mastering odd count peyote. You learn how to do odd-count with an easy pattern that lets you become confident with that odd-row turn!
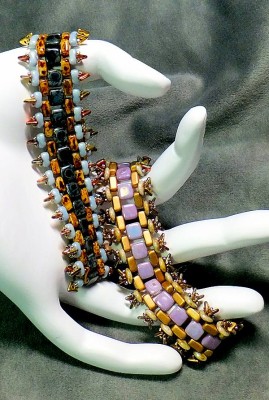
- Slither: Slide into the world of odd count peyote using two-hole beads. To make a pun, it’s a “hole” new way of looking at (and working with) odd count. Every time I wear this bracelet, I get compliments on it! You’ll learn two ways to make this bracelet, with additional ideas as well.
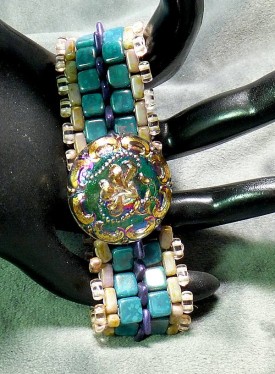
- There be Dragons!: Get ready to try your hand with two hole triangle beads, which gives the impression of a dragon’s scales. Also learn to accent your bracelet with a Czech button, for a clasp that truly compliments the bracelet.
Slither Bracelets
You will be able to adapt what you learn in any bracelet to any other bracelet. Do if you like the clasp on one, with embellishments like one of the others, you’ll be able to mix and match.
And you will learn the easy way to make the odd-row turn!


The cost of the tutorial is just $9, and you get 47 pages and 86 photos, most of them very close up — you see exactly where you need to put your needle and beads!
(If you are reading this on a translated page, please know that this tutorial is written in English.)
Note: This book is in PDF form, and is only available by downloading. However, you get this ebook immediately after purchasing — you will see a link on your invoice, and you’ll also get an email with the same link. The file is about 2 MB in size.
I created this ebook all by myself — I took the photos and wrote all the text. Good or bad — it’s all mine, LOL! (I hope that you consider it very good though.)
I do my absolute best to over-deliver and give you an excellent value for your money.
To get this ebook digitally delivered (i.e., you get it immediately), simply click the “Add to Cart†button above.
Intro to Flat Spiral – Video Tutorial
 If you’ve never done the flat spiral bead weaving, I hope you’ll find this interesting and fun. You’ll learn how to make the flat spiral in a video, and then you’ll see more information on how I made these two bracelets.
Ready, set…let’s bead!
Supplies Needed and Video
You don’t need a lot by way of supplies. For the video I used:
- Size 6 seed beads in silver
- Size 11 seed beads in a matte pink
- Size 11 triangle seed beads, in silver-lined peridot
- Needle; I used a size 12, but you could use a size 11 and possibly even a 10.
- Thread; I used One-G, but use the thread of your choice.
As I mentioned in the video, I only used about a 3-foot length of thread for the demo. For a real project like a bracelet, I recommend at least a 6-foot length of thread, as it’s a bit on the tough side to end a thread and start another when working with the flat spiral weave.
Information on the Two Demo Bracelets
I did say in the video that I had more info on the two demo bracelets, what I used to make them. Here you go!
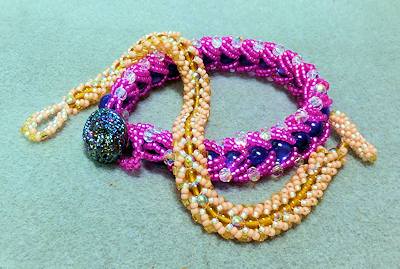
Beige (Sand) Bracelet: I used size 11 Japanese seed beads, in two colors — light beige colorlined clear and matte shrimp. For the center bead, I used 4mm Czech druk (round) beads, in topaz AB. I also used some size 11 gold triangle beads (made by Toho).
Start by stringing on a stop bead and two druk beads. For your side beads (the “butterfly wings”, so to speak) use a size 11 light beige, two matte shrimp, the triangle, two matte shrimp and one light beige. Run your needle through the bottom hole of the bottom druk bead. Run your needle up through the two druk beads, and use the same color pattern on the other side.
Pink and Purple Bracelet: I used size 11 Japanese seed beads n matte silver-lines bright pink For the center bead, I used 8mm round purple cat’s eye beads. I also used some 4mm clear crystal beads. Although I said in the video they were round Swarovski crystals, upon looking at them again, I am more inclined to think they are Czech crystals, as they are not totally round. You can use 4mm fire-polished beads as a good substitute.
Important:Â Your center bead needs to have a good-sized hole, because you are going to pass your needle and thread through the hole six times.
Start by stringing on a stop bead and two 8mm beads. For your side beads (the “butterfly wings”, so to speak) use six size 11 pink beads, the crystal and six more size 11 pinks. Run your needle through the bottom hole of the bottom 8mm bead. Run your needle up through the two 8mm beads, and on the same side, string on another six size 11 pink beads. Run your needle through the crystal that you strung on in the previous pass, then add six more pink beads. Pass your needle up through the bottom hole of the bottom 8mm bead and do the same pattern on the other side.
![]()
![]()
![]()
![]()
![]()