DIY Cabs – Create a Faux Dichroic Look!
A few months ago, I got this idea to make my own dichroic-look cab. I had just found a bag of cabs (some glass, some acrylic) that I had bought years ago, and I wondered what I could do with them. I had been playing around with some nail art, so I thought, “Hmmm, wonder what these cabs would look like if I polished them”?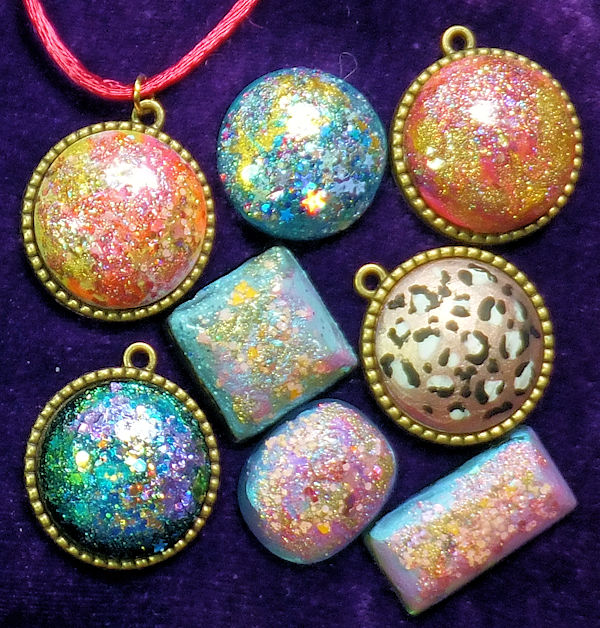
I tried it, and to paraphrase the potato chip saying, “I couldn’t stop with just one.” With a bag of cabs and a zillion bottles of nail polish, I was having a grand time! And as an FYI, in the video below, I got my cabs and bezels from Amazon.
 Tips for Great Looks
Here are some tips I came across for some great cabs,
- Use a base coat. I tried out both black and white; each looked fine, but whatever color, a fast-drying polish is the best bet.
- Don’t use an expensive topcoat polish. you’re going to use lots, so an inexpensive clear topcoat is best.
- Have fun with glitter or glitter polish. I loved using all kinds of glitter and glitter polish. If you use loose glitter, make sure it’s solvent-resistant.
- Let each layer dry thoroughly.  The more layers you apply, the longer it will take to dry. The last coat may need a day to dry (if you put on more than 5 coats, that is). Or, for your final clear topcoat, you can use Poshe or Seche Vite, which helps seep up the drying time considerably.
- If you have a UV lamp… If you happen to have a UV lamp, try using gel nail polish. Since I have a UV lamp, I tried using Gelish basecoat, then a bunch of different regular polish, then some Gelish topcoat. Yes, I know it’s not exactly cheap, but it dries super-fast with the UV lamp. Plus, the gel topcoat will give the cab a lot of depth.
But the best tip I can give you is to just play! Get out your nail polishes, grab some cabs, and have yourself a blast!
Sliding Knot Necklace – Complete with a Blooper!
I kept meaning to make a tutorial on how to make a sliding knot, so you can adjust the length of your necklace or bracelet on the fly. I just never got around to it, until one day I was staring at my beading stash and spied the leather cording. Ah hah! Time to do that sliding knot video!
But First – Why Use a Sliding Knot?
I don’t know about you, but there are times that I wish a particular necklace was on a slightly longer or shorter chain, depending on the clothes I am wearing. A sliding knot lets you adjust the length without having to run off to get a pair of pliers. Or have to take the pendant off one chain or cord and place it on another.
And you do it while you are wearing it, so changing the length is easy as changing your mind. 😉
Video and My Oops!
I’ll make this post short and let you watch the video, complete with instructions of how – and how not – to make your own necklance, LOL! I hope you get a chuckle out of it.
Get Twisted! Learn Twisted Tubular Herringbone
 Twisted tubular herringbone was something that I had a whole lot of problems learning. I read the directions in magazines and books a zillion times, but I could not grasp how to work the stitch.
Then came the idea — surely someone, somewhere, has done a video from which I can learn the stitch. Search and ye shall find is my motto (at least when it comes to tracking down something related to beading). I sought, I found and now I am ready to teach you!
What is Twisted Tubular Herringbone?
If you’re familiar with the regular tubular herringbone beading stitch, you may wonder what makes this variation do the twist (so to speak)? (And if you’re not already familiar with the regular version, here’s my tutorial on tubular herringbone.)
The twist is formed by both beading tension and also how the needle path dips (for lack of a better term) after each new set of beads is added. It’s really hard to explain, but when you actually see it, you’ll have that “ah-hah!” moment. At least, I hope you do!
In the video demo, I use the stitch to make a bracelet (as you can see in the photo on this page). You can make your own bracelet, or go even farther and make a gorgeous necklace!
Half the fun of the twisted herringbone is picking different color combos for each column of the tube. You can make it to appear to twist even faster, depending on how often you change the colors of your seed beads.
Twisted Tubular Herringbone Video
If you’d like to learn how to make your own twisted tubular herringbone jewelry, sit right down, grab yourself something to drink, then sit back and watch. The video is a little over 20 minutes long, but when you’re done, you should know enough to start your own bracelet or necklace!
Oh, and if you like the bracelet I am wearing in the video, see my post on odd-count peyote.
As to supplies, I used the following for an 8-inch bracelet:
- Fireline, 6lb size
- Beading needle, size 11
- Seed beads, size 8. You’ll need about 25 grams for an 8-inch bracelet, split between whatever number of colors you choose to use.
- 2 end caps (gold-plated)
- 1 magnetic clasp
- Open jump rings
- 2 Crystal rondells (10mm x 6mm)
So, I hope you find the video help, fun and it inspires you to create your own twisted tubular herringbone jewelry! 😀
![]()
![]()
![]()
![]()
![]()